ABOUT

FEEDS

CONTACT

  • .(JavaScript must be enabled to view this email address)
  • Here are some frequently asked questions emailed to me you might want to read first.

EMAIL DIGEST

    For a daily update of Candy Blog reviews, enter your email address:

    Delivered by FeedBurner

CANDY RATINGS

TYPE

BRAND

COUNTRY

ARCHIVES

Featured News

Tuesday, July 1, 2008

Join the Candy Forums!


Want more than just a candy review a day?

Just register and create your own polls, get help finding your favorite candy or share recipes. It's all candy talk, all the time.

POSTED BY Cybele AT 7:50 pm    

Friday, June 6, 2008

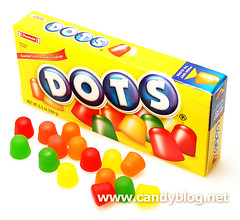
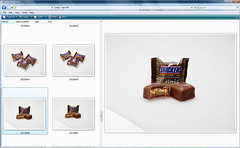
Candy Blog Photography

DotsFolks ask from time to time about how I do my photos. I’ve shot over 25,000 candy photos ... but have only about 2,500 to show for it. Here’s how my process works.

Now that you’ve seen my current photo studio, I thought I’d back up a bit and show you how I used to take photos before 2006, because you really don’t need all that if you’re on a budget and especially if you’re not doing the volume I do. 

WHAT I SHOOT WITH

My camera is the Sony DSC-V3. I bought it used on eBay for $375 in March 2006 and it included a 1 gb memory card (which I actually fill up in one photo session from time to time but more importantly it’s fantastic for my whale watching).

WHERE TO SHOOT

I had two spots I liked to take photos:

Chewy SweeTarts1. Early in the morning at my old office. The roof in the building across from mine was resurfaced with some sort of white reflective stuff back in 2004 and suddenly became an amazing bounce-board for my north-facing office windows. I never needed to turn on the lights during the day. I’d position a series of sheets of white office paper, tape it to the side of my laser printer and let it curve down. Then more white paper to cover the desktop and shoot. I’d use some other pieces of white cardstock to bounce light to fill as best I could.

I didn’t have a tripod, I’d just place the camera on a book or notebook (angled if I needed it), set the shot up and then turned on the timer (this left both hands free for holding the cardstock for bouncing the light).

DSC07008r2. The roof deck at my house. This was a little trickier because I spend more daylight hours at the office than at home, so it was usually on weekends that I’d set up my photo shoots. Of course it was outside ... and sometimes it was windy, or hot or overcast.

The light was much better up there, most the time I’d set up a piece of white posterboard, sticking one side to a cardboard box and letting it slope down onto the surface of the table. This was under a white patio umbrella, which provided a nice diffuse light and of course I’d use the other pieces of posterboard for bounce.

On these occasions I used a tripod, which gave me much more control and crisper shots.

DSC01565rThis is one of my first shots I ever took for the blog. I’d say I’ve evolved quite a bit, at least in clarity. But some things have remained the same.

While some folks call my old methods a little ghetto, I still take photos like that from time to time. Just some white office paper to grab a quick snap and when I’m traveling, sometimes I pick up some posterboard so I can take some product shots on the road.

The other option, of course is to get some studio lights. The photo of my studio looks kind of jumbled, and believe me, it’s pretty much chaos all the time.

SETTING UP THE SHOT

While the photos may show the candy isolated in the middle of nothingness, believe me, there’s lots nearby.

Photo SetupThis shot shows how most of my setups look. A little piece of the Tac ‘n Stik in a wad to prop up a package, and then the candy in front of it ... there’s no need to clear the decks of other items unless it’s something that has silver reflective wrapper. (I also use little dots of the sticky stuff when I have spherical candies to keep them from rolling around.)

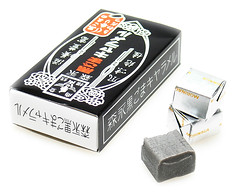
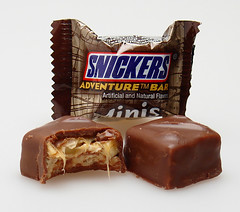
Silver reflective packaging is a bugger to shoot, everything has to be masked around it or else it shows up as a reflection. I have a piece of white posterboard with a little hole the size of my lens for just such occasions. The bonus is that it also bounces a good deal of light, so it gives a crisper, more even exposure.

The trick here is to light the background and foreground at the same level.  This will give the best base for the high key white.

I also keep the objects quite close to the edge of the table, about 1/3 of the distance to the curve of the back (you can see that I didn’t do that in earlier shots, that’s part of what creates that shadowy background). A tripod is essential to product photos. It’s the best way to get clear and sharp photos, especially for longer exposures. Tripods are not expensive, so even if you can’t afford a shooting table like this, get a tripod.

Black Sesame CaramelsTake test shots. Then look at them on the camera - zoom in and really look at it. Nothing worse than getting through a shoot (after you’ve eaten the candy or torn the wrapper open) and finding out that you can see yourself in the mylar or a glare is obscuring the brand name. In this case, with the Morinaga Black Sesame Caramels, the package is upside down. In my desire to feature the Japanese on the side of the box instead of the English that’s on the other side, I turned the whole thing upside down instead of just turning it ... and it wasn’t until several months later when I actually did the review that I realized this. (Gah!)

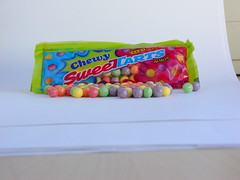
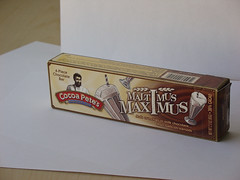
I work from the outside to the inside. It’s common sense, but something I’ve messed up on before. I shoot the outside of the package (sometimes right after I buy it and don’t complete the rest of the process until I schedule the review), then open it, shoot the item with the wrapper, sometimes solo ... then and only then do I break it open or take a bite. Sometimes, if I have a bounty of individual items, I’ll do several versions to get the best “bite with caramel pull” or “cross section of panned nut.”

At the end of the session I usually have a dish of bitten candies.

The shooting surface is a matte plexiglass. I wipe it down with 409 quite often, either because it’s gotten sticky or because I plan on eating whatever I place on there later. When I was shooting on posterboard I would often throw a piece of white office paper down when I knew I was going to have something gooey.

POST PROCESSING THE SHOT

choicesAfter shooting, I have to pick from however many photos I’ve shot. Sometimes I’ll do a dozen on just one setup, playing with depth of field, angle, focus and exposure levels.

I always take pictures on the highest setting (the full 7.2 megabytes). Most of the time I use the plain old JPG setting, since these photos are for web. If I were doing something for print, I’d probably use TIFF or RAW - but then I’d run into storage issues. As it is I have about 60 gb of candy photos.

If your camera has something called bracketing in the settings, I recommend giving it a try. It bumps the exposure up one level and down one level, taking three shots pretty much at the same time. This is a good way to see what levels would be best for a particular shot without moving the settings.

For the most part I use the program mode (P) on my camera. I set the exposure bumped up to +1.7, even so, the background rarely turns out white. It’s gray.

Unretouched PhotoThis is what the photo looks like out of the camera (I cropped it, that’s all - in the above screengrab of my thumbnails you can see that there was a piece of bounceboard in the shot).

If I’ve done everything right then all the photo needs is a little adjustment in the Photoshop Image > Adjustments > Curves menu. I push the upper white a little brighter and usually pull down the midtones a little darker. That’s it.

BTW - you don’t even need the full Photoshop to do this. Photoshop Elements (which I got for free with my Wacom graphics tablet) works perfectly fine. Some other free image adjustment programs also do a great job - the best thing to do is take a great shot that needs only a few adjustments.

But sometimes I’m sloppy and a few more adjustments are necessary. I might clone out some crumbs and sometimes the corners are a little darker for very large field shots so I’ll whiten them with the eraser or paintbrush.

curves

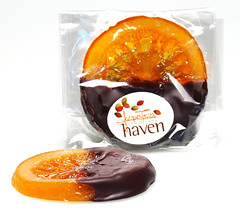
Then things might need a little additional help, maybe a little burning/dodging for glared spots or things that are too dark in the shadows and lose their detail. Cross-sections might need a bit of dodging to enhance the difference between the caramel & nougat or at least bring up the contrast in that small area.

Using Curves to Whiten Background

RESIZING FOR THE WEB

For the most part I’ve moved to Flickr to host my photos and share them there (for a while I had them both on my own server and on Flickr). Flickr automatically resizes the photos to three useable sizes: 100 pixels, 240 pixels and 500 pixels. Flickr has a limited but good photo editing service called Picnik that will allow you to do some of the above adjustments right there. Picasa also offers some excellent hosting & editing services.

If you’re hosting your own photos it’s usually best to use your photo software to create the web version so that it will be sharp and small at the same time. Photoshop has a “save for web” feature that allows you to preview exactly what the photo will look like saved at various compression settings.

DEVELOPING A STYLE

The style of Candy Blog photos is supposed to be clinical.

My original idea with my photography was for it to be a true representation of both the candy and the package. Because the blog was supposed to do what I wanted the internet to provide for me - a breakdown of what that candy actually is. (I couldn’t find a site that did that, so I made one.) I like the photos on a blank white background, no background stuff to interfere. It isolates the subject and it really helped me to focus on just the candy itself, if only for that brief session when I photographed it.

Yes, many of them are quite tasty looking, but I’ve always done my best to show what the candy actually looks like. I’m not trying to sell you anything.

(There first dozen or so posts on Candy Blog actually don’t have the candy featured. It wasn’t until a couple of weeks later that I realized that’s what people really wanted to know ... what’s inside that box.)

I set up my shots to be eye level with the candy for the most part, like the candy is as big as you are.

TIPS FOR SHOOTING GOOD PHOTOS

  • Get as close as you can but keep it clear. (If you need to back off to get clean focus, do that instead of a blurry close up.)
  • Keep the background uncluttered. It doesn’t have to be white, but other wrappers, a pile of clothes or your dog’s tail aren’t the subject and probably shouldn’t be in there.
  • Use lots of light.
  • Color correct. If your camera doesn’t have a manual white balance or something that allows you to select your light source, then correct it in post.
  • Take lots of shots. It’s digital, feel free to keep shooting until you think you got what you need.
  • Use a tripod. If you can’t, figure a way to brace yourself to keep the camera from moving.
  • Think about how you’re going to use the photo - with text beside it or all by itself. (This may help with the angle.)
  • TIPS TO MAKE YOUR PHOTOS EVEN BETTER


  • Look at a lot of photography. Pay attention to advertisements, other blogs, photo sharing sites, magazines. Notice angles, exposure, how they deal with background elements. Start trying to work those elements you think are successful into your own photo shoots.
  • Try some props. Not everything needs to be on a blank background. Pick up some cheap tiles, pretty ceramic dishes, wrapping paper or origami paper, glassware or even linoleum samples.
  • Shoot the whole object. It’s better to have more to work with in post processing. Closeups of elements are good in most cases, but be sure to get at least some shots of the whole.
  • Crop it. You might not shoot the perfect shot, but crop it to compose the shot so that the subject is clear.
  • More reading:

  • How the Candy Critic Reviews a Treat
  • Taking Professional Looking Photos Without a Professional
  • Correcting White Balance
  • Table Top Studio

  • Related Candies

    1. Chocolate Storage Solutions
    2. Candy Blog Photo Studio
    3. The Traveling with Candy Balancing Act
    4. Browse the Candy Blog Photo Archive

    POSTED BY Cybele AT 8:42 am     Behind the ScenesCandyFeatured NewsPhotography

    Sunday, May 25, 2008

    All Candy Expo 2008 - Final Link Wrappers

    Here are the last few stories that have trickled in about All Candy Expo. I expect that after everyone has gotten a little sleep over the holiday weekend there may be some more wrap ups.

  • The AV Club at The Onion shows us how it’s done with their roundup up of All Candy Expo and note a few moments of poor treatment by booth-cops. (Enter the Octopus has a post about that, too.)
  •  

  • Chicagoist has a list of Five Items from All Candy Expo That Should Not Be Allowed to Exist. I have to admit, I have never reviewed any of the items on that list.
  •  

  • The Candy Podcast kids (and parents) also went to All Candy Expo and have an incredible set of photos available on Flickr.
  • Interesting news from the trade publications, this one about convenience stores from Convenience Store Petroleum magazine. The thing that caught my eye was this little factoid about how we approach the candy aisle: Shoppers shop first by segment (gum, chocolate, etc.), then by usage, then package type and finally by brand.

    This makes perfect sense. I usually have something in mind like “I want something tangy!” and then go from there. I’m not sure what they mean by package type, I’m guessing size. (Though most convenience stores don’t have much choice in size of packages like grocery stores do.)

    POSTED BY Cybele AT 3:06 pm     All Candy ExpoCandyFeatured News

    Thursday, May 22, 2008

    All Candy Expo - Thursday Link Wrappers

    As the All Candy Expo for 2008 comes to a close, writers from all over are heading home and this little trickle of stories is just the start of what will be a summer of fun coverage of new products & trends:

  • Jamie at Candy Addict has great observations on the new trends with dark chocolate, combining chocolate & fruit and chocolate & nuts.
  • Candied Orange Slice

  • Liz didn’t stay for the whole time, but has a pretty snazzy haul to show off (and a photo of Jacques Torres). 
  •  

  • Faith at The Kitchen (Apartment Therapy) has a wonderful condensed version of Jacques Torres’ session on how to taste chocolate.
  •  

  • Caitlin at Candy Addict also wraps things up with a few closing notes ... and confirms that her haul was 45 pounds of candy. (What a bad year to have luggage surcharges.)
  •  

  • Brandweek discusses Mars push into more customizable candy. M&Ms can be printed with sayings, logos and now even your face. Dove bites can be wrapped in your own customized sayings. Someday maybe they’ll let me special order Marathon bars. 
  •  

  • The Los Angeles Examiner actually has a caffeine columnist who gave the new Tootsie Roll Maxxed Pops a try.

  • Related Candies

    1. Crackheads
    2. Caffe Acapella - Coffee Confections
    3. The Traveling with Candy Balancing Act
    4. M&Ms Line
    5. Jacques Torres

    POSTED BY Cybele AT 3:05 pm     All Candy ExpoCandyFeatured News

    Candy Tease: All Candy Expo 2008 #5

    imageName: Stainer Chocolate
    Description: comprises one of The World’s Largest Selection of Gourmet Chocolate Bars. Our lines include unique flavors such as chili pepper, rose, world spices, green tea and jasmine, champagne, and many more. Our base chocolate includes organic, sugar-free, single origin, dark, milk, and white chocolate.
    Release Date: 5/6/2008
    Notes: This isn’t a new product, but their appearance at the All Candy Expo marks their move into the North American market. This Italian brand has lovely packaging and of course a huge array of flavors. I picked a couple up at Chocolate covered in San Francisco, so I’ll have some tasting notes in the coming months, hopefully as they start appearing more regularly in American stores.

    Name: American Classics: Mississippi Mud Truffle, New York Cheesecake Ganache & Southern Pecan Chocolate Torte
    Brand: Russell Stover
    Description: Chocolate medleys inspired by some of America’s best-loved, homespun desserts.
    Release Date: 5/1/2008
    Notes: So far it only says that these come in little squares in single flavor packs (no mixed bags).

    Name: Dan’s Chocolates
    Brand: Dan’s Chocolates
    Description: Dan’s Chocolates makes all natural individually wrapped chocolate bars and truffle bars by blending the finest chocolates and funky inclusions. With names like “Peppy-R-Mint,” “The Caffeinator,” and “Trail Hound,” we try not to take ourselves too seriously.
    Release Date: 5/20/2008
    Notes: The packaging is cute, with nice bright colors and pretty easy-to-understand but distinctive names, Dan’s is poised to at least raise some interest in the crowded premium market. No word on the retail price though.

    imageName: Yummiees LOW GI Natural Fruit Flavored Jelly Candy
    Brand: Allseps & Capricorn Liquorice
    Description: made with Natural Colours, Natural Flavours and do not contain Cane Sugar or Artificial Sweeteners. yummiees are sweetened with a Natural LOW GI Fruit Syrup and are also low in sodium. 4 varieties - Aussie Animals, Party Mix, Snakes & Frogs
    Release Date: 1/8/2008
    Notes: When someone says lower GI, I think lower gastrointestinal tract, not low glycemic index. (But that’s my baggage ... too many doctor shows.)

    Related Candies

    1. Friday’s San Francisco Candy Adventure
    2. Brach’s Gummi+Plus & Tropical Gummis
    3. Russell Stover Private Reserve Vanilla Bean Brulee
    4. Lindt: 60% Extra Dark Truffles

    POSTED BY Cybele AT 2:39 pm     All Candy ExpoCandyNew Product AnnouncementFeatured News

    Wednesday, May 21, 2008

    Wednesday All Candy Expo Link Wrappers

    Dave Simmer’s excited about the new Star Trek Pez (and the chocolate candy tablets ... we’re going to have to disagree there).

    imageChicago Sun Times has an excellent set of tasting notes (I have to disagree with a couple of items) including Crackheads, Crown Tequila Nuggets, the new M&Ms Premiums, Giant Chewy Wonka Nerds and more. Don’t miss the photo gallery and the separate story about customizable M&Ms that you can put your own face on! (photo by Keith Hale/Sun-Times)

    Medill Reports adds a few comments on trends, and further info & a glimpse of the new M&Ms Premiums packaging.

    Fellow candy writer Elizabeth LaBau who edits the candy section for About.com has some stellar coverage so far. Here’s her rundown from the first day but don’t miss her great photos, especially of Joseph Schmidt’s chocolate creations.

    image

    A big tip of the hat to Candy Addict and their notes from the floor:

  • Candy Expo Day 1 - Brian’s Notes - I’m so happy to hear we’re finally getting Spearmint Mentos and his thoughts on the M&Ms Premium line.
  • Candy Expo Day 1 - Caitlin’s Notes - I completely understand how overwhelming it is (and it’s not a first-timers thing, I think it’s always like that).
  • And finally, just for fun, relive Cameron Gray’s Tuesday with photos as they were posted from the floor.

    POSTED BY Cybele AT 8:00 am     All Candy ExpoCandyFeatured News

    Candy Tease: All Candy Expo 2008 #4

    imageName: Altoids Cr?me de Menthe
    Brand: Wrigley’s (Mars)
    Description: New Altoids Cr?me de Menthe delivers the quick hit of strong flavor you expect, but with a “sweet kick.” This new flavor is available in both the Curiously Strong Mint and Chocolate Dipped Mint varieties. Altoids - The only mint that freshens your mouth and your mind.
    Release Date: 6/1/2008
    Notes: I’m not sure what the difference between peppermint, spearmint and creme de menthe is, but I’m strongly curious.

    Name: LifeSavers Gummies Tangy Fruits
    Brand: Wrigley’s (Mars)
    Description: Includes six great-tasting bold flavors and the perfect chewy texture that consumers love. The new Tangy Fruits roll pack include the following flavors: Tangerine, Watermelon, Lemon, Sour Apple, Tangy Cherry and Wild Berry Punch.
    Release Date: 6/1/2008
    Notes: I love tangerine. I will follow any LifeSavers tangerine product to the ends of the earth. Consider me a customer. (I’m wondering if these are like the sours, but without the tart sugar sand coating.)

    imageName: Loud Truck Energy Gummi
    Brand: Loud Truck Energy Gummi
    Description: Loud Truck Energy Fueled Gummies.Taste great. Contains Guarana Extract. Natural energy.Vitamins B12 and C. No crash Energy.
    Whether your playing sports, stayin up late for school,at work or just need that extra boost of energy. 1 oz bags. 12 bags per case.

    Release Date: 3/1/2008
    Notes: I think this is the best name ever for a candy. I don’t know why, but it’s so crazily evocative (and I don’t care much for loud trucks) that I’ll probably end up buying a package just because.

    imageName: WOWzers
    Brand: Maxim Manufacturing and Marketing
    Description: Sour Powder filled tube bubble gum
    Release Date: 5/1/2008
    Notes: It’s like a gum cigar, only with a hollow center with a strawberry Pixy Stix inside.

    Name: Gummi Butterflies
    Brand: Albanese Confectionery
    Description: Bold colors and delicious flavors. Flutter away with the newest version of the World’s Best Gummi!
    Release Date: 5/20/2008
    Notes: I’ve already seen these and I have to say, they’re so cute I wish they made them when I was a kid. They’re also coming out with Theater sized boxes of their 12 Flavored Bears and Super Sour Neon Gummi Worms. (It would be cool to find their stuff more easily, it’s usually reall well priced.)

    (images courtesy of the manufacturers’ press kits)

    Related Candies

    1. Brach’s Gummi+Plus & Tropical Gummis
    2. Lifesavers Gummies Sour
    3. Mentos Plus Citrus Mix
    4. Chocolate Dipped Altoids
    5. Lifesaver Gummies

    POSTED BY Cybele AT 3:58 am     All Candy ExpoCandyNew Product AnnouncementFeatured News

    Tuesday, May 20, 2008

    Candy Tease: All Candy Expo 2008 #3

    imageName: Ice Cream Parlor Mix
    Brand: Jelly Belly
    Description: Ice Cream Parlor Mix 3.1 oz and 6.5 oz bags - Featuring Cold Stone Creamery’s top signature creations: Chocolate Devotion, Our Strawberry Blonde, Birthday Cake Remix, Mint Mint Chocolate Chocolate Chip and Apple Pie a la Cold Stone.
    Release: 3/1/2008
    Notes: Jelly Belly was promoting these at the Fancy Food Show, but I didn’t get a sample of them (but I did get a $5 Cold Stone gift card!). Finally I have a bag and will have some notes on those soon. I haven’t tried them all, but I have very little faith in this mix, mostly because I wouldn’t want to combine my apple pie with my mint chocolate chip & strawberry.

    Name: Holiday Sugar Babies
    Brand: Charms
    Description: Same great tasting Sugar Babies presented in red, white & green.
    Release: 1/1/2008
    Notes: While I wasn’t blown away by the Caramel Apple Sugar Babies, if these are just a candy shell over the Sugar Babies caramel, I might like them. Look for them later this year.

    imageName: Brach’s Theater Boxes
    Brand: Brach’s (Farley’s & Sathers)
    Description: The rich, decadent taste of Brach’s(r) chocolate make their debut in theater boxes. Double Dipped and California Raisins, are joined by new Toffee Crunch, Mint Pearls, and Chocolate Covered Milk-Maid(r) Caramels for today’s grab and go lifestyles.
    Release: 5/20/2008
    Notes: I might go to the movies more often if I could get some sort of chocolate covered almond toffee crunch at the concession stand.

    Name: Sunkist Fruit and Sour Fruit Gummies
    Brand: Healthy Food Brands
    Description: They are a great-tasting, “better-for-you” fruit gummy candy that has 35% less sugar than the average leading gummy brands and contain 100% RDA of Vitamin C with only 70 calories per serving.
    Release: 04/15/08
    Notes: These are not to be confused with the current Sunkist Fruit Gems made by Jelly Belly (which are essentially vegan). They have less sugar not just because they’re made with fruit juice, but they’re also made with sorbitol (not as the sole sweetener though).

    (images courtesy of the respective manufacturers)

    Related Candies

    1. Brach’s Gummi+Plus & Tropical Gummis
    2. Jelly Belly - All Natural
    3. Sunkist Fruit Gems
    4. Jelly Belly Soda Pop Shoppe
    5. Chocolate Covered Sugar Babies

    POSTED BY Cybele AT 3:33 pm     All Candy ExpoCandyNew Product AnnouncementFeatured News

    Page 32 of 40 pages ‹ First  < 30 31 32 33 34 >  Last ›

    Meticulously photographed and documented reviews of candy from around the world. And the occasional other sweet adventures. Open your mouth, expand your mind.


    Facebook IconTwitter IconTumblr IconRSS Feed IconEmail Icon

    COUNTDOWN.

    Candy Season Ends

    -3197 days

    Read previous coverage


    Which seasonal candy selection do you prefer?

    Choose one or more:

    •   Halloween
    •   Christmas
    •   Valentine's Day
    •   Easter


    image

    ON DECK

    These candies will be reviewed shortly:


    image