ABOUT
FEEDSCONTACT
EMAIL DIGESTCANDY RATINGSTYPE
BRAND
COUNTRY
ARCHIVES
|
RecipesSunday, October 7, 2007
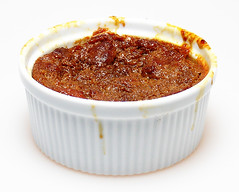
Mary Jane’s Bread Pudding
I made this recipe based on the bread pudding recipe I’ve been using for years in The New York Times Cookbook (I have a first edition, I don’t know if this is in subsequent editions): New England Bread Pudding. I’ve never actually followed the recipe as written, I’ve always mucked around with it. This bread pudding has a base, mild flavor of peanut butter with a little woodsy hit of molasses that’s mixed into the milk & egg custard base. There’s actually no refined sugar in here (except for whatever was used in the bread). Bread pudding is pretty hard to mess up, so feel free to alter proportions, just be sure to cook it completely.
Preheat oven to 375 degrees F. Cube or pull apart the bread. Bread can be stale or fresh, but let it dry out a bit if possible. Set aside. In a large pot that will hold all of the above ingredients (approximately 2 quarts) put in the milk and butter. Heat over medium until milk starts to scald. Turn down to low and add peanut butter and molasses, whisk to combine (or if you like things rather freeform, just stir). Add whiskey. Scramble the eggs in a separate bowl, then add about a half a cup of the hot milk mixture slowly, combine then add to milk mixture in pot. Combine and allow contents to warm up to just under a boil. It will thicken slightly with the addition of the eggs. Turn off burner. Add bread, stir gently then allow to sit for five minutes. Prepare your baking dish. For mine I used four ramekins that hold 12 ounces each. You can make it all in one dish (one that holds 48 ounces - pick something that won’t be more than 3” deep or else it won’t cook completely in the center). Whatever you choose, you’ll need a pan a bit larger to use as a water bath. Place the smaller pan into the large pan. You can grease it if you want, I don’t and it doesn’t seem to make a bit of difference. Optional: drizzle some molasses in the bottom of the baking dish. This gives it a bit of a sauce on the bottom, but if you’re not fond of molasses (why are you making this?) then you can omit this step. Scoop the pudding mixture with a measuring cup or ladle into the ramekins or baking dish. Make sure it’s spread evenly. I crumbled a little brown sugar on top to make a crust, but feel free to omit. Put the pan into the preheated oven. Add water to the larger pan, about an inch or two. (Make sure this doesn’t dry out.) Yes, you can add the water before you put it in, but this makes it very heavy and more likely to spill. Bake for 40-60 minutes. In order to check for done-ness, listen to hear if the butter is sizzling around the edges. Also, the pudding will pull away from the sides a bit. Insert a knife into the pudding about one inch from the side. If it comes out clean and hot, it’s probably done. Shake the pan gently and see if the center has a more liquid “jiggle” than the rest. If so, leave in another five minutes. Repeat the above. If you bake it a little longer, that’s okay too, just make sure that the water bath doesn’t evaporate. Allow to cool and set up before serving. Can be refrigerated and served cold or warmed up in a microwave or oven. Serving suggestion: A la mode or with some whipped cream. Drizzle a little extra molasses and or peanut butter on if desired. Makes 8-12 servings The bread pudding is rather hearty and filling, so I’d suggest it as a winter dessert. I also think it’s a mighty fine breakfast. (I know, some people think that’s crazy, but really, how different is bread pudding from French toast when you think about it?) I’m planning on making this again with an egg bread and possibly more peanut butter. I’ll report back with any findings. Related CandiesSunday, April 8, 2007
Chocolate Hellfire Chip Cookies
But I really liked them and thought there might be a way to use them in something else that would temper that sizzling aftertaste. So I dug out the traditional recipe for Nestle Toll House Cookies and mucked around with it. 375 F Degree Oven - Bakes 9-11 Minutes - Makes 48 cookies (I make mine big) Here’s where I diverged from the regular recipe ... I didn’t have the 3/4 of a cup of brown sugar the traditional recipe calls for so I just made up the difference with white sugar. Really, this is a bad compromise. Get yourself some brown sugar - the cookie part was just too bland and didn’t have that good crystalized crunch that brown sugar gives it. Second divergence, I only had 1 cup of the Cayenne Chocolate, so I chopped up another cup of a mix of milk and dark chocolate Wilbur Buds. (That probably saved the cookies from being totally noxious.) Third divergence, I prefer Pecans in my chocolate chip cookies. But I didn’t have those. So I took some raw whole almonds, chopped them up coarsely and stuck them in the pre-warming oven to toast up. I used my new KitchenAide mixer and place the butter and sugar in there and blended on low with the mixing paddle until it seemed pretty smooth. Then I added one egg at a time and let those beat in. Then a dash or two of vanilla. In a separate bowl I combined the other dry ingredients: flour, baking soda and salt. Then poured that in, in thirds, to the mixer and let it mix together on one of the lower settings. Then I pulled out the beater paddle and mixed in the two cups of chocolate and the nuts (remember to let the nuts cool, I didn’t, and they can make the batter a little runny). Scoop small spoonfuls onto a clean, ungreased cookie sheet and place in center of oven to bake. Mine ended up going about 13 minutes each. It might have been the change of the brown sugar/white sugar that made the difference, or I might just prefer mine a little crispier. If you’re looking for a cookie recipe that you can make and not end up eating all of them at once, well, this might be for you. I give these a 4 out of 10. (My husband gave them a 7 out of 10, but he doesn’t have the same issues with overly spicy things that I do.) I don’t like having to pick the chocolate out of my chocolate chip cookies. What was I thinking? Thursday, April 5, 2007
Peeps Mash UpsFolks are obsessed with Peeps around this time of the year. As I’ve stated before, I love the idea of Peeps, I just don’t really enjoy eating them. So I thought I’d try to improve my experience by creating some Peeps Mash-Ups. These aren’t full-blown recipes but more of a “dry fondue” with some items I had lying around:
Peeps Rocks - here I’ve mashed my Peep into some Strawberry Pop Rocks. First, when mashing a Peep, it helps to pull it apart. This way you have two sticky halves for picking up other candy goodness as well as alleviating the issue of “double dipping” if you’re mashing with a buddy. When I mashed the Pop Rocks into this fresh Peep, the rocks started snapping immediately. (You can’t see the noise in the photo, but it’s cracklin’ away, trust me.) The cotton-candy-like flavor of the strawberry goes really well with the flavorless Peep. Light and refreshing. The pops give it a little sizzle.
I wasn’t really fond of this flavor combination, or the colors. The red and green (cherry & watermelon) looked too Christmasy. The taste combo was pretty good though. The crunch of the Nerds gave the spongy marshmallow a good texture and the zap of tartness also balanced out the sweetness of the Peep.
You could probably try mini dark chocolate baking chips for a less sweet experience (though you’d lose the crunch). The little tube they come in is especially easy for mashing on the go, just press the stickiness to the opening and tip the M&Ms Minis into it.
I’m not really sold on the combo, but after eating everything pictured here within about 15 minutes I had a stomach ache. Gah, I’m getting another one just typing this up! So, what are your ideas for Peeps Mash-ups - either theoretical ones, or ones that you actually do? (See previous Marshmallow Mashing: Marshmallow Mash-ups & More Marshmallow Mash-Ups.) Related Candies
POSTED BY Cybele AT 11:28 am Candy • Mash Up • Peeps • Recipes • Review • Easter • Just Born • Mars • Nestle • Topps • Carbonated • Chocolate • Compressed Dextrose • Marshmallow • Sour • 7-Worth It • United States • Fun Stuff • Saturday, February 17, 2007
Recipe: Don’t Make This!I am hoping to make a new candy or candy themed recipe every month. And I admit that I did make this, but I haven’t a clue what it is and I certainly don’t recommend it.
So I decided to alter the recipe in the Tartine cookbook (written by Elizabeth M. Prueitt & Chad Robertson). The ingredients are supposed to be:
I thought I would swap out the sugar for my candy cane sugar and throw in a little corn starch for good measure. So my new recipe looked like this:
You can see where this is going. Anyway, the directions said that the eggs, sugar and salt should be put into warm water bath and whisked together. Then put them into the stand mixer and whip the bejeebers out of them. Well, after about eight minutes of whipping I had what I could only call “Pepto Batter”. It was a vile pink and not whippable. I’m not sure if some oil got into the egg whites or if the corn syrup present in the crushed candy canes will keep it from whipping, but it just wasn’t going to happen. Not dissuaded from chucking the whole project, I lined a 13” x 9” pan with some parchment. I added the slivered almonds and then put it into the pan and popped it into the oven.
It puffed up nicely and got a crackly surface, but still didn’t want to “bake” entirely. The bottom seemed syrupy and wouldn’t firm up. So I left it in the oven. The Rochers were supposed to bake for 15-20 minutes at 350. I baked it for an hour and the bottom was still wet. All that aside, it was tasty stuff. I ate all of the edges. It was crispy on the outside, soft and chewy on the inside with a good minty flavor that wasn’t too overwhelming. I was surprised that the almonds went so well with it. So, I’ll try again and next time I’ll just use the candy cane sugar as a garnish on the top, not as the sugar replacement. Well, next time I’m going to try the recipe as written before I go mucking around with it. Live and learn. Wednesday, January 3, 2007
Recipe: Candy Cane SugarOne of the most flexible things you can make out of old candy canes (or any hard candy) is candy cane sugar which can be used just like regular sugar in a variety of ways.
I made mine from a couple of humongo peppermint sticks by Spangler (each weighs 4 ounces). Two of these sticks will make 1 Cup of candy cane sugar.
There are a couple of ways to make it, I use the old fashioned method.
Put the candies into one of the ziploc bags and then into the other. Once you start pounding away the sharp pieces will cut the bag a bit and if you don’t want a powdery-sticky mess, it’s best to double bag. Whack away. Break up the big pieces first, hitting them as best you can with the flat side of your mallet or hammer. After breaking up the candy, dump it into a bowl. Shake the bowl gently to get the larger pieces to the top, scoop them off and return them to the plastic bag for further pulverization. Repeat until you get your candy sugar to the grind that you desire. Alternate Method: Break up candy canes into small pieces by hand. Put into clean Coffee Grinder (or food processor). Pulse grind to break up big chunks. Continue until you reach the desired consistency. For best results: When finished put into an airtight container. If you live in a particularly humid area keep it in the fridge to prevent it from reforming into a sticky pile. Use single-colored candy. Multicolored candy canes (such as red and green stripes) will make for a rather muddy colored sugar once it’s pulverized. Do not use plastic produce bags, they’re just too thin and you’ll end up with bits of plastic in your sugar. See the grand list of 33 Things to do with Candy Canes for ideas on how to use your Candy Cane Sugar. I made the Peppermint Stick Layer Cake! 33 Uses for Leftover Candy CanesHere you go, oodles of things to do with those leftover candy canes. (Or maybe you want to pick some up on sale.)
Use them whole: Crush them lightly: Make Candy Cane Sugar: Use them in recipes: So, what can you add to the list? Recipe: Peppermint Stick Layer CakeThis was my traditional birthday cake throughout my teen years: The Peppermint Stick Layer Cake. My mother came up with it as a way to use up the remaining candy canes from Christmas but it’s a great cake to make any time of year. The whipped cream is lighter tasting and less sweet than a buttercream or sugar frosting, but you’re free to create your own adaptation with your favorite frosting recipe. When the cake is well chilled it’s almost like an ice cream cake.
I like mine as a four layer cake because it means that the ratio of whipped cream to cake is about equal. Ingredients:
Allow your cake layers to cool completely before assembly. Whipped Cream Chilling is essential to great whipped cream. I make mine using a two bowl method. Take a large pasta pot and fill the bottom with ice and then a bit of water. Fit a mixing bowl over it (I have a lipped bowl that fits inside my pasta pot well). Make sure the ice water mixture comes up to at least 1/3 of the side of the mixing bowl. Pour in your pint of whipping cream. Add a dash of salt. Whip using an electric mixer or whisk well. At about the halfway mark (when the whipped cream starts to hold its shape) start adding your crushed peppermint candy. Continue to whip and taste as needed. I prefer my whipped cream a little less sweet but your mileage may vary depending on how chunky your candy is and how sweet you want it. Be prepared to add between 1/4 to 1/2 cup of crushed candy. If you want it really minty, add some peppermint extract. If you want it really pink, add some red food coloring. Assembly Once your cake layers have cooled, make sure that they are flat (cut off any mounding). Either cut carefully or use dental floss to split each of the layers into two. (I’ve found cutting them easier if the cake is frozen.) Place first layer on cake plate. Mound some whipped cream on layer and spread evenly. Place next layer on top of that, repeat with as many layers as you have. Frost top. Depending on how generous you’ve been with your whipped cream, you can also ice the sides, I kind of like being able to see all the layers without it being cut. Dust the top with some remaining chunks of candy canes or whole starlight mints. Don’t add them until you’re ready to serve, they get a bit runny after about an hour in the whipped cream. Chill cake if you’re not serving immediately. You can even freeze it and serve it that way. Other variations: ● Use Cinnamon Candies instead of Peppermint Related: How to make Candy Cane Sugar and 33 Things to do with Leftover Candy Canes Monday, March 6, 2006
2006 Independent Food AwardsAs part of this year’s Independent Food Festival and Awards sponsored by tasteEverything, I’ve been tapped as a jurist to give out an award for excellence in food. (You know it’s gonna be candy.) I decided after my mind-blowing experience touring candy factories in the Bay Area last December that it had to be something that really helped me to immerse myself in the true source of chocolate. My 2006 Winner of the Independent Food Awards is The Best Things to Stick to your Marshmallow: Scharffen Berger Chocolate Covered Cacao Nibs.
Cacao nibs are roasted cocoa beans, what all chocolate is made from. Scharffen Berger then pan coats them with 62% cacao semisweet chocolate. They’re complexly flavored little buggers, about the size of rice crispies - they’re crunchy, sometimes fibery, sometimes buttery and nutty ... always a surprise. Some flavors are like wine, raisins, coconut, coffee, oak, banana, apricot, sweet almond, grapefruit, cherry, cinnamon, clove ... I could go on and on. They’re like a blank canvas and a symphony all at once. They take over the senses and make you forget your train of thought. The coolest part is that each little morsel is independent of the others - it might have come from a different tree, might have been harvested weeks before or after its buddies in the tube. Eat one and get a sense of the particular, eat a palmful and travel the world. So, what do you do with these besides just eat them like candy? You can bake with them, as I saw at Tartine in San Francisco, where you can get Rochers (like soft meringues) made with cacao nibs.
But I’m not really a baker. You can’t just serve an olive boat of these morsels to guests. Then oddly enough the answer came to me in the mail the same week. I was reviewing Plush Puffs, flavored, handmade marshmallows. With proximity being the mother of invetion, I tried putting things on my marshmallow. Actually, I tried mashing my marshmallow into things. Now, given that I have the title of jurist, it was incumbent upon me to evaluate at least several other marsh-mashables. So I ordered up more Scharffen Berger Cacao Nibs and a full array of Plush Puffs (Orange-Honey, Sam’s Sour Lemon, Maple Pecan and Vanilla Bean) and scoured my kitchen and a few stores for some options.
In the interests of trying to find the perfect thing to mash into my marshmallows, I pulled a few things out of the cupboard and ordered some others off of Chocosphere. Here are the results:
The definition of pure confection heaven has to be Orange-Honey Plush Puffs with Scharffen Berger Chocolate Covered Cacao Beans. This is the standard by which all other mashmallow-ables will be judged. (Really, why did I go on, how much better could I expect things to get?)
As a final confirmation about the Chocolate Covered Cacao Nibs, I brought the array of my top contenders to an Oscars (tm) viewing party Sunday night. At the end of the night the marshmallows were nearly gone and so were the CCCN while the plain nibs were largely untouched. On top of that, people were pleased with the fun combination of flavors. (And as a capper we got to taste some new regionally-sourced chocolate ice creams. Yum!) There is one other company that I know of that makes chocolate covered cacao beans, called SweetRiot. I haven’t tried them yet, but I imagine they too are awesome. If you’ve stumbled across this posting without first visiting the tasteEverything, have a look at all the other incredible finds from around the globe. Related CandiesPOSTED BY Cybele AT 10:47 pm Candy • Mash Up • Recipes • Scharffen Berger • Chocolate • Marshmallow • Nibs • United States • News • 
|
Meticulously photographed and documented reviews of candy from around the world. And the occasional other sweet adventures. Open your mouth, expand your mind.
SEARCHSearch the Candy Blog archives
    
FEATURED NEWS ITEMS
COPYRIGHT NOTICEAll content (text and photos unless otherwise credited) is copyright 2005-2025 by Cybele May Please do not use my photos without prior permission directly from me, they represent what I ate in preparation for these reviews and are not to be used for other purposes. Design by Hop Studios
|
|||


 I picked up these Koppers chocolate morsels called Cayenne Pepper Savory. They were powerful strong. Every once in a while I would eat another one and I’d be back to my original assement, “It burns! It burns!” (
 Peeps Nerds - when you look at it, a Peep is really just a giant spongy Nerd with a pointy nose. Oh, and eyes. Nerds may have eyes in their little cartoon versions on the packaging, but not on the real candies like Peeps do.
  Peeps & Mini M&Ms - this is a natural combo and the colors couldn’t look better together if I tried. The little M&Ms adhere really well to the Peep’s exposed marshmallow. The sweet chocolate has a good crunch though it might be a little too sweet.
  Peep Tarts - I have to admit that I was especially proud of the name for this one. Originally I wanted to use Pixy Stix for the powder, but I couldn’t find any (I try not to keep them in the house, for sanity’s sake). So I took the powder from an extra
  I started with the desire to make the Rochers that I’ve had at


